|
It's time to investigate more if you return home to find a pool of water beneath your water heater. Leakage of water may indicate that your water heater requires repair and that there is a problem. We'll go over some of the most typical causes of hot water heater leaks as well as solutions for you to try. We also offer some insightful advice and practical hints on how to keep your water heater in good working order and prevent future expensive repairs. 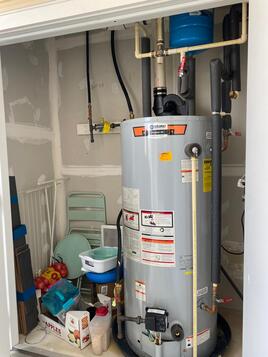 Why is my water heater leaking? 1:- Ruling Out CondensationYou suspect a problem when you notice water on the floor near your water heater. You must first rule out any other possible causes of water. One possible reason for water surrounding your water heater could be condensation. (a):- Condensation on a Gas Hot Water HeaterGas water heaters with high efficiency may produce harmless-looking condensate that may appear to be leaking. This is how condensation can be recognized:
(b):- Condensation on an Electric Water HeaterThe hot cylinder tank of an electric hot water heater can condense since it is situated in a chilly room. By cleaning the outside of your hot water heater and observing if the moisture returns in a uniform manner over the surface, you may check for condensation. If it does, it resembles condensation the most. (c):- Look for Other CausesMake sure the source of the water leak isn't coming from your furnace, air conditioner, or any other related systems, such as water softener lines, if your HVAC system and hot water heater are in the same room. Inspect the water supply lines that provide your water heater with water as well. The issue may be caused by leaky pipes or lines above or below the water heater (read on for solutions). 2:- Turn Off Power SupplyAfter confirming that the water heater is leaking, shut off the electricity (for electric heaters) or gas (for gas heaters). Since water and electricity don't mix, this is an important step that you should never omit! It's best to get a professional right away if you feel uneasy handling gas or electric water heaters. Don't tamper with any gas pipes; instead, leave that to the professionals. Locating Your Gas Shut-Off ValveYour water heater should normally include instructions on the front that describe how to shut off the gas valve. Look for the shut-off valve next to your water heater if you are unable to locate it there. You can totally cut off the gas supply by turning a knob or lever on this device, which is often found at the top of the heater. Locating Your Power BreakerMake sure the circuit breakers in your electrical panel are off if you have an electric water heater. Look for a label on your electric panel or use the graphic on the panel door to assist you identify the correct breaker if you are unable to determine which one regulates the water heater. After you've located it, turn it to the OFF position. 3:- Turn Off Water SupplyCutting off your water supply completely is another safety precaution. Find your main shutoff valve and turn it off to accomplish this. Usually, you can find this outside on the curb or in the basement. You should turn off the cold water supply for your hot water heater in addition to turning off the main line of your water supply. To accomplish this, locate the hot and cold water valves on your hot water heater. Usually, your cold water supply is designated in blue, and your hot water supply is marked in red. Turning off the cold water will assist in limiting the amount of additional water damage caused by leaks. 4:- Establishing The Source of Your LeakIt's time to identify the source of your water heater leak now that you've turned off your main line, the cold line supply, and the gas or electricity. 5:- Common Reasons for a Leaking Water HeaterThe most frequent reason water heaters leak is from a broken or malfunctioning pressure release valve. When this valve malfunctions, hot water may begin to seep out of the water tank because it keeps pressure from building up within. Other such reasons could be:
(a):- Water Leaking From The TopYour hot or cold water inlets, which supply water to your pipes when needed and into the tank for heating, may be the source of any standing water at the top of your water heater. Your water heater may leak from the top due to loose pipe connections. Tip: Use a pipe wrench to tighten the cold and hot water inlet pipes. (b):- Water Leaking From The SideYour heater's temperature pressure relief valve is probably the source of the water leak coming from the side. When too much pressure builds up inside the tank, the temperature pressure relief valve acts as a safety feature to let hot water and steam out of the container. Tip: Verify that the temperature is not higher than the advised 120 degrees. In case the temperature is appropriately adjusted but the leak persists, the valve is faulty and requires replacement. (c):- Water Leaking From The BottomA problem with the drain valve may be the cause of any water leakage you observe near the base of your water heater. When necessary, such as during maintenance, the drain valve is intended to empty the water tank. Tip: Replace the drain valve after checking it for corrosion. Adjust the valve slightly if there isn't any corrosion, but don't overtighten it as this could lead to harm. It might need to be replaced if tightening doesn't work. 6:- Avoid Future Issues with Regular MaintenanceIf none of the problems mentioned above are present when your hot water heater leaks, it can be the result of sediment or mineral deposits building up. An yearly flush of your water heater is crucial for preventive maintenance and routine upkeep. This can lessen the chance of a leak and help prevent the need for expensive repairs owing to buildup. You should also routinely inspect your hot water heater for any indications of damage or leaks to ensure optimal performance. If you do detect a problem, get in touch with an expert right once to have the problem evaluated and ensure that using your hot water is safe. Repairing or Replacing Your Water HeaterAlthough these require frequent maintenance, water heaters are a necessary component of maintaining the comfort of our homes. It's critical that you respond fast if you see water leaking from your water heater. Examine the system for any obvious symptoms of damage, and if your water heater is more than ten years old or requires frequent repairs, it may be time to replace it with a new one from a professional.
There are several benefits associated with a new water heater:
0 Comments
Has your water heater recently been flushed? The removal of silt that builds up on the tank's bottom is an essential task that needs to be completed at least once a year. This is particularly valid if you reside in a region with hard water. Because it's out of sight, it's simple to overlook the task, but accumulated silt lowers your water heater's heating performance and increases your costs. In this article, we discuss about how to flush a hot water heater? Tools Required For Flushed Water Heater1- 4-in-1 screwdriver 2- Adjustable wrench 3- Bucket 4- Hacksaw 5- Hammer 6- Knee pads 7- Plumbers tape 8- Rags 9- Shop vacuum 10- Slip joint pliers Materials Required For Flush A Hot Water Heater1- 1-1/4-in. x 1-1/2-in. female PVC trap adapter 2- 2" brass nipple 3- 24-in. piece of 1/2-in. I.D. vinyl tubing 4- 3/4-in. MIP x 1/2-in. barb fitting 5- 3/4-in. x 3-in. nipple 6- Brass ball valve 7- Brass elbow 8- Dielectric nipple 9- Garden hose adapter 10- Shop vacuum hose adapter You can be in for an unpleasant surprise if you haven't flushed your hot water heater in a long time or if you haven't done so in years due to sediment buildup. Your water heater may be making a popping or rumbling noise, which could be an indication of excessive sediment buildup. That sounds like steam bubbles rising through the dirt. Sediment builds up hot areas on a gas water heater, which can harm the tank and lead to an early failure. Sediment accumulation on an electric water heater might lead to the bottom heating element failing. Thus, maintaining your hot water heater will save energy costs and increase its lifespan. Learn how to empty and flush your water heater. How to Flush a Water Heater: Step by Step Guide1:- Install a Shop Vacuum AdaptorAttach a female PVC trap adapter (B) to a 1-1/2-inch PVC x 3/4-inch FIP adapter (A) using glue. Note: You may now attach your shop vacuum to 3/4-inch pipes with this. Vinyl tubing with a 1/2-inch I.D. is connected to the barbed fitting (C). 2:- Drain the Liquid of Water Heater
3:- Take Out the Old ValveTurn the plastic nut beneath the knob to unscrew and remove the valve while using a shop vacuum to apply suction through the TPR port. Expert advice: If it breaks off, use a hacksaw blade to cut the fractured section until you reach the metal threads. Then chip out the fragments using a screwdriver and hammer. 4:- Put the New ValveTake off the ball valve's handle to make room for all of the 3/4-inch fittings. A 3/4-inch full-port brass ball valve with threaded ends, a 3-inch x 3/4-inch galvanized nipple, and a 3/4-inch MIP x G.H. garden hose adapter (the BrassCraft/Plumbshop No. HU22-12-12TP is one option) are needed to build a new drain valve. Note: The sediment will probably clog the drain valve as soon as you open it, making it impossible for you to completely close the valve after the water has been emptied. After that, you'll have a leaking water heater and sediment accumulation. An ancient drain will not only clog, but its tiny aperture will prevent debris from being sucked through. For this reason, a new drain valve needs to be constructed. 5:- Install the New ValveClose the new full-port valve after installation. The garden hose should have one end attached to the valve and the other end running into a colander placed over the floor drain. 6:- Flush the TankFlush the tank after removing the vacuum hose from the TPR port. Pro tip: The full-port valve will allow the majority of the silt to be flushed out. Short bursts of opening the cold water valve at the top of the tank will shoot the remaining contents toward the drain. Until the water runs clear, let it run. 7:- Suck Out the SedimentAfter removing the full-port valve, use your shop vacuum adapter and 1/2-inch vinyl tubing to remove any leftover silt. Once you're done, remove the lever handle to avoid unintentional opening and close the ball valve. After that, replace the blow-off tube and TPR valve. 8:- Refill the Water Heater
If you just upgraded your water heater, you might have been shocked to see that the new device doesn't require a conventional standing pilot light. Similar to furnaces, the majority of modern gas water heaters use an electrical igniter rather than pilot lights to start. Here's a brief look at the reasons behind the abandonment of pilot lights as well as the alternative kind of ignition.
(1): Energy ConsumptionTo increase energy efficiency, the majority of water heater manufacturers have shifted away from using standing pilot lights. A standing pilot light wastes a significant amount of energy since it must continuously burn a tiny amount of gas to keep lighted. A water heater's pilot light will normally use five to ten therms of natural gas each month, depending on the model. You will ultimately have to pay an additional $5 to $10 per month for a pilot light at the national average rate of approximately $0.95 per therm. (2): Reliability ProblemsPilot lights aren't very dependable anymore, which is the other major reason they're not used as often. You will need to manually relight the pilot light if it is ever blown out or your gas supply is stopped before your water heater can function once more. Contemporary water heaters do away with this problem by employing an automated electronic igniter. (3): Modern Alternatives to Pilot LightA pilot light is still used in many modern water heaters. They do, however, use an intermittent or automated pilot in place of the conventional pilot light, which is always on. The gas burners are still ignited by a flame in this instance, but the pilot is automatically lit when the device needs to heat up and extinguished when it shuts off. Additionally, water heaters with direct-spark or hot-surface ignition are available. Direct-spark igniters function by igniting the gas burners immediately by producing an electrical arc or spark. There are similarities between a hot-surface igniter and a lightbulb filament. A tiny probe receives electricity flow, and the probe quickly heats up enough to light the burners. You can rely on the staff at AC Repair Burke Plumbing if you require any water heater service in the Virginia region. Both tankless and conventional water heaters are installed and maintained by us. In addition, we are experts in gas line services, water line replacement, sewer repairs and replacement, leak detection, drain cleaning, and a wide range of other plumbing installations and repairs. Make an appointment for servicing or ask any questions you may have by calling AC Repair Burke Plumbing right now. 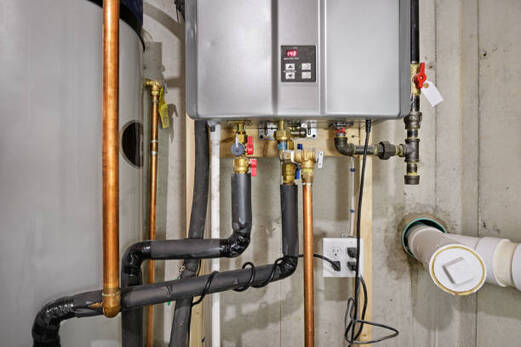 Why Modern Water Heater Don't Have Pilot Light Also Read This Article: Air Conditioner Heat Mode Not Working
This article describes how to use the reset button to restart a hot water heater that has tripped. Performing this one step could fix your cold water problem. It's crucial to understand that the reset button is the "high limit switch" before continuing. It's a safety switch that cuts the water heater's electricity when something might be dangerous. In order to determine what might be causing your water heater to malfunction, you should contact a professional if the reset button trips frequently.
(a): Cut off the Power Supply of Water HeaterThere are two methods that you can turn off the electricity to your hot water heater: Find your water tank and remove the electrical plug from the wall socket to turn the tank's electricity off. Putting the circuit breaker (the one with the label "water heater") in the OFF position is another technique to cut the power. Find the primary electrical panel in your house. Usually, you can find them in a utility room, storage closet, or garage. In either case, before moving on to step two, check sure the water heater's electric power is turned off. Turn the water heater circuit breaker to the ON position as a test if it is currently in the OFF position. If the breaker returns to the OFF position right away, there may be a more serious electrical issue. In order to prevent potentially dangerous situations, circuit breakers will flip to the OFF position. Make an appointment with an expert to identify and fix the issue. (b): To Reset Water Heater Button, Access the Water Heater ButtonOnce the water heater's power is turned off, unscrew the two screws to remove the metal plate that covers the thermostat. Keep the screws handy. It is likely that the plate will have some sort of insulating material behind it. When the insulation is removed, the reset button ought to be visible. It's most likely red in color and may even have the word "reset button" written on it. Firmly press the button in. By doing this, the heating element's electricity should be reset. Replace the insulation and, using the screws you salvaged, make sure the metal plate is back on. Next, insert the plug back into the socket or turn the circuit breaker back to the ON position, depending on how you shut off the electricity. (c): Check the Issue is Resolved or NotCheck to see if this has resolved your hot water problem after around 30 minutes. You should have hot water in approximately 30 minutes if your hot water heater is operating properly, and you'll have avoided paying a professional to come out. Reset the button on the other panel as well if your hot water heater has two panels—an upper and a lower one—and you're still not getting hot water. Just carry with Step 1 and Step 2 as directed, being sure to turn the power off once again. Next, give it another 30 minutes. A more serious issue may be indicated if your water heater trips again shortly after or if you still don't have hot water after thirty minutes of waiting. Reset buttons will turn off the power in order to prevent potentially hazardous scenarios. There are several potential causes of the issue, including a malfunctioning thermostat, a damaged heater element, unsecured wiring, or a short circuit. It's also possible that there are external electrical problems with the heater. This is the time to get in touch with an expert, like AC Repair Burke Plumbing Services, to identify and resolve the issue on your behalf. Make sure the water heater's electricity is off while you wait for a professional to solve the issue. By doing this, potentially hazardous circumstances will be avoided, and more harm will be avoided.
 PROS AND CONS OF DUCTLESS MINI SPLIT SYSTEMS IN 2024 Do you wish to stay away from dealing with your home's fluctuating temperatures, drafty rooms, and expensive utility bills? It might be time to give a ductless mini split system some thought. However, you must thoroughly consider the advantages and disadvantages before making any judgments. Although installing a ductless mini-split system can increase the comfort and energy efficiency of your house, there are disadvantages as well. To help you choose the best option for your house, we'll go over the six benefits and drawbacks of ductless mini-split systems in this post. Prepare to find out if you're a good fit for a ductless mini-split system! But before we get started, let's quickly go over the benefits and drawbacks of ductless mini-split systems, which we'll talk about in more detail later: Pros
Cons
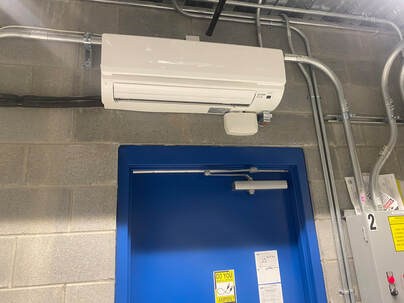
HOW DUCTLESS MINI SPLIT AC SYSTEMS WORKThe popularity of ductless mini-split air conditioning systems is growing because of its ease of installation, energy economy, and versatility. However, how do they function? How is your home heated and cooled by them? The main attributes and parts of these cooling systems are as follows: (a): Outdoor UnitThe compressor and condenser of a ductless mini-split air conditioner are housed in the outside unit. Through a conduit that is made up of the power cable, condensate drain line, and refrigerant line, it supplies cool air to the indoor unit. (b): Indoor UnitDepending on the size and design of the room or area that needs to be cooled, a ductless HVAC system may contain one or multiple interior units. The evaporator and blower in the indoor unit uniformly distribute the cold air. Through the conduit, it is connected to the outdoor unit. (c): RefrigerantTo cool the air, a ductless air conditioner employs refrigerant. A cooling effect is produced when the refrigerant releases heat that has been absorbed from the inside air. It is a closed system that doesn't need to be refilled in most circumstances. (d): Remote ControlWith the remote control that comes with most ductless systems, you can change the temperature, fan speed, timer, and other settings from a distance. Voice control and Wi-Fi are additional features on some versions. (e): Inverter TechnologyInverter technology, included in many ductless HVAC systems, modifies the compressor speed in response to cooling requirements. As a result, there is less noise, less energy use, and more accurate temperature management. With the versatility of zoning that mini split systems provide, you may independently regulate the temperature of various indoor units. In multi-room settings, when each occupant has distinct cooling requirements and preferences, this is helpful. (f): Zoning CapabilityWith the versatility of zoning that mini split systems provide, you may independently regulate the temperature of various indoor units. In multi-room settings, when each occupant has distinct cooling requirements and preferences, this is helpful. To put it briefly, a ductless mini-split air conditioning system transfers heat from inside air to the exterior by use of refrigerant. The interior unit that is connected to the outdoor unit then distributes the cool air through a refrigerant coil. THE PROS OF DUCTLESS MINI SPLIT SYSTEMIf you're searching for a flexible and energy-efficient heating and cooling system for your house, a ductless mini-split system might be the solution. Compared to conventional HVAC systems, this adaptable system has a number of benefits, such as simple installation, zoning capability, and accurate temperature management. The advantages of ductless mini-split air conditioning systems, which have a big impact on your home's comfort and energy costs, will be discussed in this section. (1): Simple SetupThe simplicity of installation is one of the main advantages of ductless mini-split air conditioning systems. Ductless mini-split systems may be installed quickly and effectively, in contrast to typical HVAC systems that need large amounts of ductwork and room-consuming central units. This is due to the fact that they are made up of just a few parts, which include the conduit connecting the interior and outdoor units. Usually, all that needs to be drilled is a tiny hole for the conduit to go through in the wall. Because of this, ductless mini-split systems are a great option for homeowners looking to cut installation costs, time, and aggravation. They are also the ideal choice for older or non-traditionally designed homes that do not currently have ducting. Furthermore, since ductless mini-split systems don't need ducts, they prevent air loss from leaks or gaps, guaranteeing the system runs well. All things considered, the ease of installation of ductless mini-split air conditioning systems is a big benefit that may save homeowners money and work while still offering dependable and energy-efficient heating and cooling. (2): Energy SavingThe energy efficiency of mini-split systems is another important benefit. Ductless mini-split systems are more effective at distributing conditioned air directly to each room in your house than typical window units, which can lose up to 30% of their heating or cooling energy through ductwork. By doing this, you can avoid paying for the unnecessary heating or cooling of spaces and also cut down on energy waste, which can result in cheaper utility costs. Inverter technology, which modifies the compressor speed and power usage to maintain a constant indoor temperature without the need for frequent on/off cycling, is another feature that many mini-split systems include. As a result, energy resources are used more effectively, system lifespans are increased, and noise pollution is decreased. Additionally, several mini-split systems have earned the Energy Star certification, which verifies that they adhere to the strictest industry guidelines for environmental responsibility and energy efficiency. Ductless mini-split air conditioning systems are a great option to reduce your carbon footprint and save money on your electricity bill. (3): Improved Air QualityIn addition to offering effective temperature control, ductless air conditioning systems enhance the quality of the air in your house. As previously discussed, ductwork is used by conventional air conditioning systems, such as central air conditioners, to circulate heated or cooled air throughout your home. Over time, ducting can accumulate dirt and blockages, which can result in poor air quality. Conversely, ductless air conditioners do not require ductwork because they connect the inside and outdoor units with a little conduit. Because there is less possibility of dust, allergies, or other debris building up inside the ducts and creating respiratory problems, the air quality is improved. Additionally, a multi-stage filtration system used in the majority of ductless mini-split systems is capable of capturing and eliminating airborne contaminants including dust, mildew, and germs. With the aid of this feature, you can make sure that the air in your house is as clean and healthy as possible. Ductless mini-split air conditioning systems might be a good option for better indoor air quality if you or someone in your house has respiratory issues or is allergic to certain indoor pollutants. (4): QuietAdditionally, these HVAC systems are quieter than other models, which makes them a great option for houses where noise reduction is crucial. A ductless mini-split system's indoor unit is normally made to run at a noise level of about 19 decibels, which is comparable to the sound of whispering or rustling leaves. This implies that the incessant and bothersome buzzing, banging, or whirring noises frequently connected to other HVAC systems will no longer be present in your house, allowing you to live in peace. You also won't have to worry about hearing any outside noise or vibration from the compressor because the inside unit of a ductless mini-split system is separated from the outdoor unit. For households seeking quiet, dependable, and affordable heating and cooling solutions, ductless mini-split AC systems are a great option since they combine energy efficiency, precise temperature control, and low noise production. (5): Integrated ZoningThe integrated zoning feature of ductless mini-split air conditioning systems is an additional benefit. With different areas of your home requiring different amounts of heating and cooling, this feature lets you regulate the temperature of each room or zone separately. For example, you can set the temperature in a sunroom differently during the day than you would in the rest of your house without having to chill it down. Additionally, you may set up distinct operating schedules for each indoor unit, allowing you to use energy and run the system only when needed. Because it runs less frequently, there is less waste of energy, more accurate temperature management, and less wear and strain on the system. Additionally, since you won't need to heat or cool empty sections in your home, built-in zoning can assist save your energy costs. Ductless mini-split air conditioning units with integrated zoning are a viable option to contemplate if you're searching for an affordable and adaptable means of regulating the temperature in your house throughout the year. (6): Ideal for Renovations and AdditionsLast but not least, a ductless air conditioning system is a great option to heat and cool the room without extending your current ductwork if you're remodeling or adding an addition to your house. Installing extra ductwork for a ducted HVAC system usually involves making time-consuming and expensive structural changes to your house. Nevertheless, ductless mini-split systems are significantly simpler and less intrusive to install because they just require a tiny hole in the wall to connect the indoor and outside units. This implies that improving heating and cooling in your home won't require you to destroy any flooring or ceilings or jeopardize its architectural integrity. Furthermore, constructing a whole ductwork system may be unfeasible or difficult in an older home without ducting; in this case, ductless mini-split systems are a wise substitute. Furthermore, you won't have to worry about connecting many indoor units to a single control system when installing them in different areas of your house because each one can be operated separately. Because of this characteristic, ductless mini-split air conditioning systems are a great option for homeowners looking to upgrade their HVAC system without having to make significant renovations or changes to their house. THE CONS OF DUCTLESS MINI SPLIT SYSTEMBefore making a final choice, take into account the potential disadvantages of ductless mini-split air conditioning systems, even if they have several advantages over conventional HVAC systems. We'll look at six drawbacks of ductless mini-split air conditioning systems in this part. You can determine whether a micro split air conditioning system is the best option for your house by being aware of these drawbacks. (1): Increased PriceThe fact that ductless mini-split air conditioners can initially cost more than forced air conditioners is one possible drawback. The cost of the indoor and outdoor units, the installation procedure, and the requirement for a professional technician to install the system can all contribute to the system's initial cost. It's crucial to remember, though, that ductless mini-split systems can actually save you money in the long run because of its energy-efficient operation and integrated zoning features, which can help cut down on energy waste and diminish utility bills. Furthermore, the initial cost of some ductless systems may be partially covered by tax credits or rebates. If you're thinking about installing a ductless mini-split AC system, you should evaluate the system's initial costs in relation to its potential long-term energy savings and other advantages. (2): AppearanceThe look of the inside units of ductless mini-split air conditioning systems is another drawback. While they're supposed to be compact and discreet, they still need to be put on walls or ceilings throughout your home, which some people find attractive and distracting. These units might not match the style of your house and can be an eyesore. Ductless mini-split systems require an indoor unit for each room they are heating or cooling, which can increase the visual clutter of your space. Conventional systems with ductwork are concealed behind walls or ceilings. Therefore, if aesthetics is important to you, make sure ductless mini-split AC systems are the correct fit for your house by taking into account these aesthetic features. (3): More Space is Needed for InstallationMore space is required for the installation of the inside and outdoor units of these air conditioners. Even though indoor units are often little and portable, your home's walls or ceilings still need to have some room for them. Installing anything can be difficult for people with low ceilings or little wall space. In addition, a firm surface with enough clearance and access to the electrical and refrigerant lines is required for the installation of the outside unit. If you don't have much room in your driveway or backyard, this may be difficult. Furthermore, people who wish to avoid making structural alterations to their home may be discouraged by the requirement to drill holes in the walls or ceilings in order to install the system. When purchasing a ductless mini-split AC system, it's crucial to take the amount of space needed for installation into account, as well as backup room in case future maintenance is necessary. (4): MaintenanceDuctless mini-split air conditioning systems need routine maintenance to be reliable and efficient, just like any other HVAC system. Every three to four months, the system may need maintenance, which might include changing or cleaning the air filters, monitoring the refrigerant levels, and examining the wiring and electrical components. While some maintenance activities can be completed by the homeowner, others need to be completed by a professional technician to guarantee proper system operation. For some households, this can mean paying extra money and experiencing inconvenience in order to avoid having regular system maintenance scheduled. Therefore, before making an investment in a ductless mini-split AC system, it's crucial to take into account the possible maintenance and repair costs related to the system. (5): Insufficient Efficiency in High TemperaturesAlthough ductless mini-split air conditioning systems are a great choice for heating or cooling your home in temperate regions, they might function better in extremely hot or cold weather. In cold or hot conditions, the system's ability to heat or cool may be restricted, which would lower comfort and efficiency. Furthermore, let's say you reside in a region with harsh weather. In that situation, you may need to supplement your ductless mini-split system with a supplemental heating or cooling source to maintain your desired indoor temperature. This may increase the cost and difficulty of controlling the temperature in your house. When making an investment in a ductless mini-split AC system, it is crucial to take the system's performance capabilities into account, particularly if you reside in a location with extreme weather. (6): Increased Cost of InstallationOver their lifetime, ductless mini-split air conditioning systems may be less expensive to operate, but their initial expenses may also be greater. Due to the labor and component expenses involved in completing the installation as well as the requirement for certified professionals to install the system, the initial prices may be greater. Ductless mini-split systems, in contrast to duct-based conventional HVAC systems, need an outside unit and an inside unit for every space, which can get expensive if you need to heat or cool a lot of rooms or spaces. Furthermore, the layout of your house may need you to purchase extra parts, such a condensate pump, which raises the system's overall cost. So give a mini-split AC system without ducting some thought. If so, you should evaluate the system's long-term benefits against its installation costs to see if installing it will be a worthwhile investment for your home. Contact AC Repair Burke For Ductless Mini Split System Installation, Repair and MaintenanceDuctless mini split air conditioning, like any air conditioning systems, has benefits and drawbacks. The choice you make as a homeowner will depend on your needs and financial situation. We provide expert installation and maintenance services for a range of HVAC systems, including ductless mini-split systems, at AC Repair Burke.
Our knowledgeable specialists can provide advice on system selection and help you decide if a ductless mini-split air conditioning system is the best option for your house. In order to maintain your system operating at its best, we can also swiftly and effectively finish the installation procedure and carry out routine maintenance. Contact us for emergency ductless mini split system Installation, Repair and Maintenance! Pipes for a kitchen sink. Do you have leaks in the drain pipes beneath your kitchen sink? Or should I clear the clog in the kitchen sink? It's time to discard that bucket that keeps dripping. Tightening the joints and straightening the pipe can stop certain leaks. However, changing your under-sink plumbing is the solution if your stripped nuts won't tighten and your old washers won't seal because they're too stiff or warped. It might not be as difficult as it sounds. Installing a new drain assembly is a sensible and dependable solution, particularly if your current pipes are outdated, as plastic pipe is reasonably priced and quite simple to install. 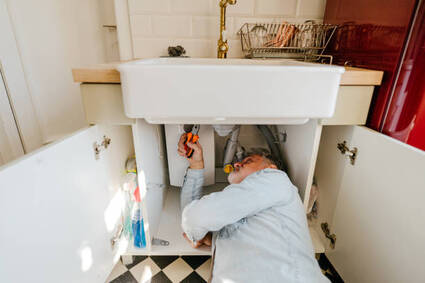 How to replace kitchen sink drain pipe Tools Required for Repairing Kitchen Sink PipesThe following are the instruments needed for the project: a hacksaw, a "4-in-1" screwdriver, pliers, "slip joint" pliers, a level, and a tape measure. It may be necessary to use additional tools based on the kind of issues you run across. The following supplies are needed for the project: PVC waste arm, rubber washer, plumber's putty, cardboard washer, basket strainer, and locknut. These items are covered in more detail later in the article, but the parts you'll need for a new drain assembly should be available in a kit at any hardware shop for less than $20 to $30. Replace Kitchen Sink Pipes(1): Disassemble the Old DrainTo remove the strainer, which is probably the source of the leak, disassemble the current drain assembly. The strainer is visible in the image below as the black area directly beneath the sink's white bottom. As indicated, turn the slip nuts counterclockwise. Note that in order to prevent the pipes from rotating, you must use the second set of pliers that are clamped or held onto the pipe part below the wrench displayed. The entire drain pipe assembly is not what you want to turn—just the slide nut. After completely unscrewing the slide nuts, lower the pipe assembly and take it out. Plumber's putty, placed between the strainer's top flange and the kitchen sink's drain hole, serves as the main seal surrounding a basket strainer. However, this seal is temporary. It may become harder, shrink, or crack with time. Tightening the locknut can occasionally be used to stop a leak. But a fresh application of putty is frequently the sole remedy. The Most Difficult SectionUnscrewing the old locknut on the underside of the sink is the most difficult step of removing the strainer. The strainer is secured in place by means of this locknut. If you are fortunate enough to have a "third hand," you can have your assistant insert pliers into the holes in the strainer from above and use a screwdriver to insert between the pliers' two handles to prevent the strainer from turning while you attempt to release the locknut below. Mineral deposits or rust frequently "weld" or seal this locknut in place. The term "spud wrench" or "locknut wrench" refers to a unique type of wrench made specifically for use with locknuts. Large slip-joint pliers with a 3-1/2-inch jaw opening will also function, and you can utilize them for further tasks afterwards. The locknut may not budge no matter what tool you try. The only thing to do in that situation is to give the locknut a single, clean cut using a hacksaw blade. It's nearly hard to accomplish this without severing the strainer threads, thus a new strainer is obviously required. (2): Basket Strainer AssemblyInstalling the new strainer assembly now requires plumber's putty, a new locknut, rubber, and cardboard washers. After dropping the strainer in from above the sink, fill the hole around the perimeter with plumber's putty between the top of your sink and the strainer's flange. Screw the locknut into place, making sure to place the cardboard and rubber washers between the top of the locknut and the underside of the sink. Make sure to remove any leftover plumber's putty that could have escaped around the strainer's lip. (3): Attach Drain pipe assembly tailpiece to the to StrainerUsing the tailpiece washer in between the strainer's bottom and the tailpiece pipe, attach the tailpiece to the basket strainer. Don't tighten it all the way though, as you'll need to take it off later to trim it. Either a side outlet assembly or a center outlet assembly could be present. You can get the parts needed for either setup at your neighborhood hardware store, depending on which one you have. The majority of the necessary components should be included in the kits for either the side outlet assemblies or the center outlet assemblies (where the trap is located beneath the center of the sink). However, you might also require the following extras, which are stated below:
Be aware that you will need to cut the waste arm, maybe the trap arm, and both tailpieces of the new PVC pipe. The best tool is a fine-tooth hacksaw. When in Doubt...Mark and cut the pipes a little bit longer when in doubt. Cutting twice is preferable to cutting too short and needing to make a second trip to the hardware shop. Remember to tuck in the tailpiece washers. Cone washers are needed for other joints. The ground joint at the trap is the only one without a washer. Once more, all may be seen by clicking the above link. Till the entire assembly is finished, assemble everything loosely. Next, tighten each and every slip nut. It is necessary to hand tighten the slip nuts. However, after testing the rebuilt assembly, if any joints leak, use the slip-joint pliers to tighten them just a bit further. InstallationIt could be necessary to replace the adapter on the waste drainpipe and join the PVC pipe and steel drainpipe with a rubber coupler. The steel drainpipe and PVC pipe are joined by a rubber coupler. There should now be an adaptor attached to the end of the existing drainpipe that emerges from the wall. This adapter ought to function similarly to the other joints in your drain assembly and have a washer and slip nut. You should not experience any issues if your drainpipe is made of plastic. However, if your drainpipe is made of old galvanized steel, you may have corrosion that makes it very impossible to release and retighten the slip nut. You will need to avoid these dated discussions if that is the case. If you can, unscrew the old slip nut. If not, use a hacksaw to cut it off, being careful not to cut into the threads of the drainpipe too deeply. After that, you'll need to buy cement, a rubber transition coupler (similar to an automobile radiator hose coupler/connection), a spare piece of plastic pipe, and a plastic trap adaptor. PVC (white) or ABS (black) pipes and adapters are available; it's crucial to use the appropriate cement for the type of plastic (PVC also needs "purple primer"). Attach the adaptor to a 4-inch straight pipe using cement, and then use the rubber stopper to connect the plastic pipe to the old metal pipe. (4): Check for Leaks in the New Assembly After You're DoneReplacing the pipes in your kitchen sink could provide challenges. Never forget that AC Repair Burke Plumbing, Heating, and Air Conditioner is here to assist you at all times. Contact us or give us a call at 703 721 4847. We would be happy to visit your house and be of assistance! 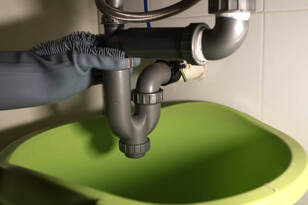 How to replace kitchen sink pipe Pipes are used in both industry and home for a variety of reasons. While leaking pipes may be inconvenient, they have the potential to do serious harm if left unattended. While you wait for an pluming expert to come and fix the leak, you can take a few quick steps to minimize the damage. In this article we learn about how to fix a leaking pipe joint? While you wait for expert repairs, you can use the following temporary solutions for leaky pipes: 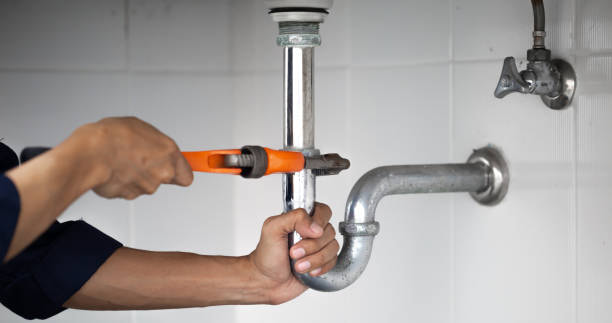 How to fix a leaking pipe joint (1): Apply the ClampPipe repair clamps provide a rapid and effective way to fix leaks by stopping leaky or burst pipes. A broken or leaky pipe joint can often be temporarily repaired with clamps. Usually, they are made up of a metal sleeve that is fitted over the surface of the leaky pipe and has a flexible rubber cushion inside to seal the leak. How to apply it: With the rubber cushion covering the pipe, position the clamp over the problem area. To stop water from seeping out of the pipe, plug the leak and create a tight seal by tightening the screws holding the repair clamp in place. (2): Use a Epoxy PuttyThe ideal adhesive for long-term repairs of pricey or challenging-to-remove things is epoxy putty. One of those things that epoxy putty can be used to swiftly and successfully remedy is a leaky pipe. It's a moldable material that solidifies in the presence of water. Epoxy putty has a moldable consistency akin to clay and is made up of two substances: a resin and a hardener. Because of its consistency, epoxy putty can be used to repair holes or cracks by gently pressing the glue into the affected area. To temporarily fix pipe leaks or gaps in cabinets, tiles, or brickwork, this putty forms a waterproof seal. It can also seal off non-ferrous metals such as brass, copper, and other plumbing components. To use, just cover the leak with putty and let it dry for a few hours. After the putty dries, it will form a strong, waterproof seal, halting the leak before it gets worse. (3): Apply Plumber's TapePatching up a leaky pipe with tape? Yes, it is feasible, despite the fact that it could seem impossible! However that's because this isn't your typical tape. Plumber's tape, sometimes referred to as "Teflon tape," is useful for waterproofing and sealing threaded pipe joints. Plumber's tape is a quick and simple way to seal leaks in your pipes. Simply pull the tape snuggly around the joint after wrapping it tightly. The impermeable seal of the tape will prevent the leak from getting worse. (4): Use the Rubber HoseIf the leak is too big to be contained with a clamp or putty, a rubber hose can be used to temporarily stop it. Cut a piece of rubber hose to a length slightly longer than the leak, wrap it around, and secure it with a clamp. By doing this, the leak will be fully sealed and prevented from spreading. (5): Cut off the Water SupplyThe best course of action is to cut off the water supply to your home or establishment if the leak happens. This holds true whether your pipes are used for oil or gas. This will prevent the leak from getting worse and buy you some time to get the necessary repairs done by an expert. Important LearningIt's important to keep in mind that these temporary adjustments are all that these leaking pipe quick fixes can do to lessen the damage caused by a leaky pipe. To stop additional damage, the leak needs to be addressed by a professional as soon as feasible. A qualified plumber can evaluate the issue and carry out the required fixes to stop the leak from happening again. 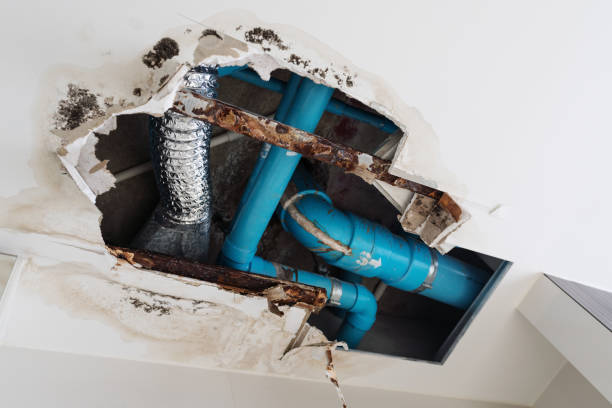 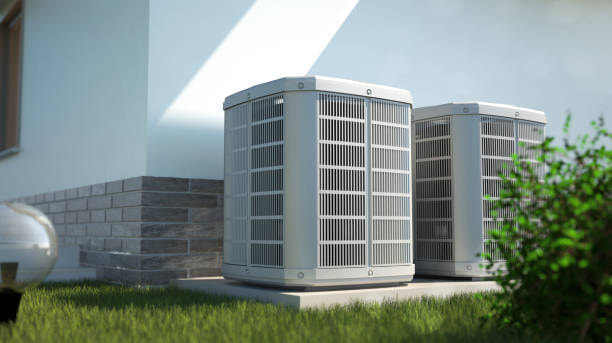 Water heater pilot won't light Our hot water heaters aren't put through much stress. All we ask is that they supply us with hot water for showers, baths, laundry, and cleaning dishes. Even the most well-maintained water heater will eventually experience problems. The pilot light in your gas or propane water heater is probably out of service if it's not providing you with hot water. In this article, we discuss about water heater pilot won't light. There are a few things you can attempt if you discover that your pilot light has gone out. Try reigniting it first; it might be all that's needed to solve your issue. Should the pilot fail to ignite or burn out quickly, there might be a more significant problem with your thermocouple or another part. You might need to contact a licensed plumber if your tankless water heater (or the hot water heater) is giving you serious or persistent problems. We are honored to be the best water heater repair company in Indianapolis, at AC Repair Burke. We invite you to call us if you encounter a pilot that is unlit while you're in the vicinity. Replaced the ThermocoupleIt can be annoying to discover that your pilot light won't remain lit, but fortunately, there's typically a rather straightforward answer. The most frequent reason why a pilot light won't ignite is almost always a thermocouple failure. The water heater has a built-in safety feature called a thermocouple. It permits gas to flow to the burner when it detects the pilot's heat. The pilot won't stay lit if the thermocouple malfunctions since it will cut off the gas to the burner and the pilot light. The thermocouple can usually be replaced in an hour and is a fairly straightforward process. This is one of the easiest water heater issues to fix, and a knowledgeable plumber can get your unit operating again quickly. Major Reasons for Water Heater Pilot won't LightA pilot light that won't stay lit most likely has a faulty thermocouple, but there are a few additional possibilities as well. Residual Gas Trapped in Water HeaterWe advise leaving your pilot out for five to ten minutes in order to allow any remaining gas to exit the device. It's not always necessary to shut off the gas valve. Simply check that your pilot light's control knob is in the OFF position. Give it a few minutes to settle before attempting to relight it. Problem with your Automatic LighterThe automated igniters included in most modern water heaters are akin to those found in gas grills. The button itself may eventually wear out and stop functioning, in which case a replacement will be necessary. You might still be able to light your pilot light using a match or cigarette lighter if the automated igniter isn't sparking. There is Blockage in your Pilot TubeOne more possible issue? You have a clogged pilot tube. This is the tiny tube that supplies the gas required to light and maintain your pilot flame. This tube could fill with trash over time. Using a needle or a little piece of wire, cleaning up the tube is typically rather simple. Age of your Water HeaterLastly, please remember that the majority of water heaters only survive ten to fifteen years. It might be more cost-effective to replace your heater rather than spend money on repairs if it is already past its prime. We are always pleased to provide an installation quote for tankless water heaters. Frequently Asked Questions (FAQ's)Why won't my pilot light come on my water heater?A clogged pilot tube is frequently the cause of an inability to ignite your pilot light. This little metal tube provides the gas required to light the pilot and maintain it burning. Debris frequently clogs the pilot tube, which stops gas from getting to the pilot light. Why is my gas water heater not igniting?The first thing to do when a gas water heater won't ignite is to make sure the gas pressure to the water heater is sufficient. The thermocouple/thermopile assembly would then be examined. We would next examine the gas control valve to determine if it was malfunctioning after verifying that. Can you manually light a water heater with electronic pilot?Today's water heaters rarely have standing pilots anymore. To light the gas, they use an electrical ignition device. Never try to manually start an electrical ignition system by hand.
Before your gas water heater can begin heating again, you must relight the pilot light if the gas has been shut off for any reason. The purpose of the pilot light in gas water heaters is to ignite the gas entering the unit so that it may burn and heat the water. The water heater won't function if the pilot isn't lit because the gas can't ignite. Here's all the information you need to relight the pilot, which is normally a pretty easy procedure to complete. In this article, we discuss about how to relight the pilot on your water heater? Determining the Pilot Light TypeFinding out what kind of ignition system your water heater has is the first step. All water heaters used to have what is referred to as a standing pilot light. This is the only kind of pilot light that ever needs to be relit; it is a little flame that burns continuously to allow the gas to be ignited whenever needed. The word automatic or intermittent pilot light is found on a large number of contemporary water heaters. An intermittent pilot lights only when the unit needs to burn gas, as opposed to having a steady flame. The pilot automatically activates when the unit needs to heat up and turns off again when the heating cycle is over. Consequently, intermittent pilots never require relighting because they are not always on. Some water heaters also use a direct spark ignition system. Instead of igniting a pilot light, the unit uses a small spark to ignite the gas right at the burner. This is similar to the spark ignition system on most propane barbecue grills except that the spark happens automatically. Hot Surface Ignition MethodHot-surface ignition is another method used by some water heaters. This ignition mechanism uses a tiny metal probe that resembles a lightbulb filament in place of a spark or flame. Electricity enters the probe when the water heater needs to run a heating cycle, nearly instantaneously turning it red hot. The gas valve opens when the probe reaches a temperature of 100°C, igniting the gas. Ignition Mechanism of Water Heater Pilot LightConsult your owner's handbook if you're unsure about the kind of pilot light or ignition mechanism your water heater employs. When your device is operating, you can also determine this by glancing at it. You don't need to worry about relighting your water heater if there isn't a steady flame to indicate that it has a pilot light that isn't a standing one. Location of Pilot LightFinding the gas knob and pilot light should be your first task. This can occasionally be found inside an access panel, but it can also occasionally be visible outside close to the unit's bottom. When you locate the pilot, open it up and observe a tiny tube that exits the gas valve. The gas supply for maintaining the pilot light's flame is provided by this pilot tube. In addition, a little metal probe will be visible next to the pilot tube. The safety sensor that determines whether the pilot light is on is called a thermocouple. The thermocouple will immediately cut off the gas supply to prevent gas leakage and possible explosion if it detects that the pilot light is not burning. Near the gas knob on the majority of water heaters is an electric igniter button. This button, when pressed, releases a spark that ignites the pilot light. To ignite the pilot, use a match or stick lighter if your unit lacks an igniter button or if the igniter isn't sparking. Relighting the Standing Pilot Light in your Water HeaterWhile the steps involved in relighting a pilot light may differ slightly throughout water heaters, the fundamentals should always remain the same. Your owner's manual should contain comprehensive instructions if you are unsure. The instructions are typically written on the water heater itself somewhere. The instructions are usually located someplace on the tank, although they are typically on the inside of the access door where the pilot is located. Turn the gas knob to off and give the device about five minutes to settle before attempting to relight the pilot light. In addition to ensuring that there is no more gas in the line, this aids in cooling the thermocouple. Next, move the knob to the "pilot" position. You shouldn't worry because there won't be any gas leakage yet. After the knob is in the pilot position, fully depress and keep the knob down. Press the ignite button several times with your other hand until the pilot light comes on. To manually light it in the absence of an igniter button, insert a match or lighter into the pilot hole. Hold the gas knob down for about 30 seconds after lighting the pilot. When you let off of the knob, the pilot should continue to glow and the knob should rise to its starting position. Proceed with step one again if the pilot will not stay lighted. Turn the gas knob to the ON position after lighting the pilot. After that, you can adjust the thermostat once more to the appropriate setting. Reasons Pilot Light Not Staying onIf your pilot light won't remain on, there may be a malfunction with the device. A thermocouple problem is the most frequent cause of this phenomenon. The thermocouple may not be able to detect that the pilot light is burning if it becomes dirty. Consequently, the pilot light will extinguish instantaneously and the thermocouple will cut off the gas supply. Usually, this issue can be resolved by lightly cleaning the thermocouple with a tiny piece of fine sandpaper to remove any dirt or debris. The thermocouple will need to be replaced if it is bent or otherwise damaged, so proceed with extra caution. If this resolves the problem, there's a chance the thermocouple is broken or malfunctioning. Replacing it is the only way to fix this problem. Even while you might be able to do this yourself, it's usually preferable to leave it to the experts. Something obstructing the pilot gas line could potentially be the reason your pilot light won't remain lit. Use a tiny needle to try to clear any debris out of the tube to determine whether this is the problem. It is probably time to get some expert assistance if your pilot still won't stay lit. It is most often the case that a replacement of the control valve or thermocouple is required due to malfunction. With years of experience working on various types of water heaters, AC Repair Burke can typically solve most issues. We may also assist with installing a new water heater in your home if the problem cannot be resolved. For over 18 years, we have been offering Virginia area top-notch HVAC Contractor services. Our team of HVAC specialists can also handle any heating or air conditioning requirements. Please give us a call now if you're experiencing problems getting your pilot light to ignite or stay lit. We'll be happy to assist you. Frequently Asked Questions - (FAQ's)Is it safe to relight water heater pilot?A pilot light going out once in a while is quite common because of typical variations in gas pressure. But after you relit it, it ought to work properly once more for a considerable amount of time. How do you relight the pilot light on a heater?To allow gas to flow to the pilot, turn the knob to "Pilot." After lighting a match or lighter, press the reset button. Hold your flame against the opening of the pilot light. Until the pilot light burns persistently, keep the reset switch down. Can you manually light a water heater with electronic pilot?To light the gas, they use an electrical ignition device. Never try to manually start an electrical ignition system by hand. If there is no pilot light glowing, then: Try to relight the pilot light by adhering to the directions on your water heater. How do you manually light a pilot light?To reset, press and hold the button. Light the lighter if the reset button doesn't work. When the pilot light valve ignites, hold down the reset button and touch it with a long match or grill lighter. Turn the valve to the "on" position as soon as the pilot light continues to burn.
After taking a shower, are you getting cold shoulder? You've found out that it's because the pilot light on your water heater has gone out once more. It refuses to stay lit even though you repeatedly igniting it. We discuss in this article, Is it dangerous if the pilot light goes out on water heater?  Is it dangerous if the pilot light goes out on water heater? Yes, it is dangerous if the pilot light goes out on water heater. You feel uncomfortable. Here, we discuss what is the main issue? Then, what is the problem? Two common sources are available. (1):- Problem Pertaining To The ThermocoupleUsually, the pilot light goes out when there is a thermocouple issue. The tiny copper rod that the pilot light strikes is called a thermocouple. If the pilot light goes out, the thermocouple's purpose is to close a gas safety valve. This is significant because the pilot constantly receives gas to maintain the flame. Nevertheless, the gas would still be discharged if the pilot flame went out. The gas may eventually gather in your house and pose a health risk. Even when the flame is still blazing, the safety valve will close if there is a problem with the thermocouple. Press the service schedule button to have your hot water back! Typical Thermocouple Problems Include:
(2):- Unclean pilot openingWe are learning about is it dangerous if the pilot light goes out on water heater? Second reason of this problem is: A dirty pilot light aperture, which HVAC contractors refer to as a "AC Repair Burke" will result in a yellow flame that is wavy. Because of its low heat, this flame is unable to adequately heat the thermocouple. A dirty pilot light aperture, which HVAC contractors refer to as a "AC Repair Burke," will result in a yellow flame that is wavy. Because of its low heat, this flame is unable to adequately heat the thermocouple. After the pilot light has cooled, clear anything obstructing the pilot aperture using a needle. By now, the flame ought to be a stable blue cone. In Need Of A Professional HVAC Contractor?If the solution to your Is it dangerous if the pilot light goes out on water heater issue wasn't found in this article, consult one of our water heater experts. For all of your plumbing requirements in the Virginia, AC Repair Burke offers top-notch service. Frequently Asked Questions (FAQ'S)Will my water heater leak gas if the pilot light goes out?You won't have a gas leak if the pilot light on a ducted heater, space heater, storage or instantaneous hot water heater goes out. This is so that in the unlikely event that the pilot light fails, all contemporary gas appliances with pilot lights are equipped with a fail-safe mechanism that cuts off the gas supply to the appliance. Is it OK to leave pilot light off water heater?Is it dangerous if the pilot light goes out on water heater? Gas is provided to the pilot light as long as the thermocouple is still heated. When the pilot light goes out, the gas is turned off and there is no chance that gas will build up. Is it dangerous to leave a pilot light on?You may want to leave the pilot light on for a variety of reasons, but in general, doing so is safe. For instance, on those chilly summer evenings, you want to use your outdoor fireplace. Additionally, the pilot flame can keep spiders from weaving webs within your stove, fireplace insert, or hearth. Is it safe to relight water heater pilot?A gas heater's pilot light may be relit using a few materials from around the house, and doing it yourself is usually safe. This is particularly true for more recent versions of water heaters manufactured within the last fifty years or so, as they use a gas shut-off device to cut off gas supply to your house in the event that the pilot light goes out. What to do if water heater pilot goes out? What to do is it dangerous if the pilot light goes out on water heater? You'll want to press and hold the knob down. While still holding the gas knob, light the pilot with a long lighter. If your gas water heater has an igniting button, press that instead. Once ignited, release and turn the gas knob to the “On” position and listen for the main burner to turn on. Why is my pilot light blowing out on my gas water heater?There are several possible reasons for a pilot light on a water heater to keep going out. It could be due to a faulty thermocouple, a dirty or clogged pilot orifice, a draft in the area where the water heater is located, a gas supply issue, or a problem with the gas valve.
|
AuthorWrite something about yourself. No need to be fancy, just an overview. Archives
April 2024
Categories |
- Home
-
Services
- Residential HVAC >
-
Commercial HVAC
>
- Professional Commercial AC Services
- Professional Apartment AC Services
- Commercial HVAC Installations
- Commercial HVAC Services
- Commercial Plumbing Services
- Commercial Water Heater Services
- Commercial Refrigeration Services
- Commercial AC and Furnace Services
- Commercial AC Pump Services
- Commercial Rooftop Unit Services
- Commercial Duct Cleaning Services
- Commercial Heating Preventive Maintenance
- About Us
- Near Me
- FAQ'S
- Contact Us
- Free Estimate
- Resources
- Blog
 RSS Feed
Local Service AreasHours of Operation
Monday 9:00 AM - 5:00 PM
Tuesday 9:00 AM - 5:00 PM Wednesday 9:00 AM - 5:00 PM Thursday 9:00 AM - 5:00 PM Friday 9:00 AM - 5:00 PM Saturday 9:00 AM - 5:00 PM |
Navigation |
Services |
Contact us
AC Repair Burke
|
Terms of service | Privacy Policy | Sitemap